- shares
- Facebook Messenger
- Gmail
- Viber
- Skype
Trong bài hướng dẫn này, mình sẽ hướng dẫn các bạn build một dự án android không sử dụng sự hỗ trợ của eclipse, intelliJ Idea.
Đảm bảo môi trường android trong cmd đã có sẵn bằng cách:
Vào cmd (nhấn biểu tượng win+R ->gõ: cmd nhấn enter) gõ “android”,”adb” Nếu xuất hiện dòng:
is not recognized as an internal or external command.
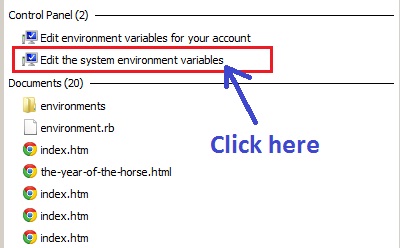
Hãy thiết lập môi trường android theo các bước sau đây. Nhấn start->gõ envir

Nhấn vào Edit the system environment variables.
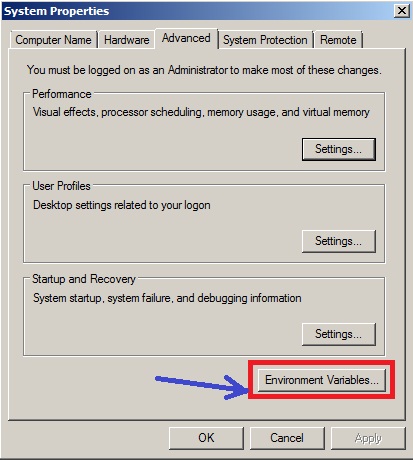
Nhấn vào Environment Variables…
Trong vùng system variables nhấn new…:
Thêm biến ANDROID_HOME
Variable name: ANDROID_HOME
variable value: trỏ tới folder android sdk. ie: C:\Program Files\Android\android-sdk
Tìm tới dòng Path nhấn edit và thêm chuỗi sau vào cuối:
;C:\Program Files\Android\android-sdk\platform-tools;C:\Program Files\Android\android-sdk\tools;
Yêu cầu: Cài thư viện ant.
Truy cập: <a href=”http://mirrors.digipower.vn/apache//ant/binaries/apache-ant-1.9.4-bin.zip” target=”_blank”>http://ant.apache.org/</a>
Tải file zip về, sau đó giải nén ->chép vào c:\apache-ant-1.9.4
Tiếp theo khai báo biến window.
Variable name: ANT_HOME
Variable value: c:\apache-ant-1.9.4
Thêm chuỗi sau vào dòng Path.
;C:\apache-ant-1.9.4;
Nhấn Ok để hoàn tất. Kiểm tra ant đã được cài đặt ->cmd gõ: ant -version
Như vậy bạn đã cấu hình xong biến android và ant. Bước tiếp theo tải 1 dự án mẫu android để build thành file cài đặt apk, nếu bạn chưa có dự án mẫu thì tải project mẫu của mình đính kèm ở bên dưới.
Vào cd trỏ tới thư mục project bạn muốn build , gõ lệnh “$ android update project –path .” để tạo cấu hình ant trước khi build thành android setup.
$ c:\sample-android-project>android update project --path .
Nếu gặp lỗi “Error: the project either has no target set or the target is invalid“, có nghĩa phải chỉ định sdk android. Chạy lệnh:
android list targets
để xem các phiên bản sdk đã cài và có thể sử dụng.
Trên máy mình test Kết quả là:
Available Android targets:
----------
id: 1 or "android-20"
     Name: Android 4.4W
     Type: Platform
     API level: 20
     Revision: 1
     Skins: HVGA, QVGA, WQVGA400, WQVGA432, WSVGA, WVGA800 (default), WVGA854, WXGA720, WXGA800, WXGA800-7in, AndroidWearRound, AndroidWearSquare, AndroidWearRound, AndroidWearSquare
 Tag/ABIs : android-wear/armeabi-v7a, android-wear/x86
Sửa lại lệnh trên như sau:
$ android update project --target "android-20" --path .
Chờ một lúc, sẽ tạo ra các files: build.xml, proguard-project.txt
Giải thích:
- build.xml: this is the main ant build script. Check this file into your version control system.
Ok, bây giờ là bước sinh ra apk file.
Tại cửa sổ lệnh gõ:
$ cd android-project-directory
$ ant clean debug
Lệnh ant này xóa binaries apk ở lần build trước và khởi tạo lại app từ ban đầu. Nếu build thành công sẽ sinh ra phiên bản debug của project.
Building an App with Dependencies
Để nhận được bài viết mới vui lòng đăng ký kênh kiến thức WordPress từ A-Z ở Form bên dưới. Bạn cũng có thể nhận được sự trợ giúp trên Twitter và Facebook
- shares
- Facebook Messenger
- Gmail
- Viber
- Skype

