Nội dung
- shares
- Facebook Messenger
- Gmail
- Viber
- Skype
WordPress cung cấp nhiều kiểu dữ liệu như post, page, attachment và wordpress cho phép định nghĩa thêm kiểu dữ liệu gọi là (custom post type). Custom post type cho phép bạn định nghĩa kiểu dữ liệu riêng có thể thêm các fields tùy ý.

Ví dụ: làm website bán hàng , eg: tạo custom post “myproduct” kiểu này có các fields như: price, off_price,manufactor..
Custom post type API
Đăng ký custom post type sử dụng hàm register_post_type. Cú pháp:
<?php register_post_type( $post_type, $args ) ?>
Trong đó:
- $post_type: kiểu dữ liệu.
- $args: mảng tham số cấu hình cho custom post type.
Xem chi tiết cách dùng hàm:
//đăng ký kiểu dữ liệu mới
add_action('init','register_new_type');
function register_new_type(){
	$args = array(
		'label' => __('Business Manager'), //nhãn hiển thị trong admin
		'singular_label' => __('Business'),
		'public' => true, 	//cho phép sử dụng các bài viết với kiểu này
		'show_ui' => true, 	//cho hiển thị tab trong admin
		'capability_type' => 'post', 	//sử dụng 1 số tính năng như kiểu post mặc định
		'hierarchical' => true,
		'has_archive' => true,	//cho phép page archive
		'supports' => array('title', 'editor', 'thumbnail'),	//sử dụng tính năng có sẵn: field title, editor, trình quản lý ảnh thumbnail
		'rewrite' => array('slug' => 'slug1', 'with_front'=> false), 	//cấu hình đường dẫn url
		'taxonomies' => array('post_tag')		//đăng ký tag chuẩn cho kiểu mới
	);
	register_post_type('type1',$args);		//chú ý: tên kiểu dữ liệu ko được viết hoa, nên viết thường toàn bộ

	//đăng ký taxonomy
	register_taxonomy("taxonomy_type1", array("type1"), array("hierarchical" => true, "label" => "Type1 Types", "singular_label" => "Type1 Type",'query_var'=>true, "rewrite" =>array('with_front'=> true, "slug" => 'slug1'),'show_ui'=>true));
	//chú ý có thể đăng ký nhiều taxonomy cho kiểu này,...
}
Có một vài lưu cần tuân thủ:
-Quy định tên custom post type (name) không được viết hoa, viết thường toàn bộ.
kiểu Post chuẩn thì có categories, còn custom post thì gọi là taxonomy. Tất nhiên category cũng sử dụng được trong custom post type.
Trong ví dụ trên đã đăng taxonomy có tên “taxonomy-type1” có kiểu “type1”.
Custom post type permalink
Đường dẫn URL cho custom post type, mặc định là:
< custom-post-slug >/< post-name >
Với custom-post-slug chỉ định bởi $args[‘rewrite’][‘slug’]
Khuyến nghị: Nếu trong website wordpress có sử dụng custom post type thì nên cài plugin “custom post type permalink”
Download plugin này tại địa chỉ: https://wordpress.org/plugins/custom-post-type-permalinks/
Sử dụng plugin này để viết lại đường dẫn cho custom post type cũng như taxonomy sẽ tốt hơn.
Tạo Custom fields taxonomy cho custom post type
Thêm fields cho taxonomy, giả sử mình có taxonomy ‘bank-type’. Sử dụng action {taxonomy-name}_edit_form_fields , với {taxonomy-name} là tên của taxonomy cần thay đổi. Thêm đoạn code sau vào functions.php
<?php
add_action('bank-type_edit_form_fields','bank_taxonomy_custom_fields',10,2);
function bank_taxonomy_custom_fields($tag){
	// Check for existing taxonomy meta for the term you're editing
    $t_id = $tag->term_id; // Get the ID of the term you're editing
    $term_meta = get_option( "taxonomy_term_$t_id" ); // Do the check
	?>
	<tr class="form-field">
		<th scope="row" valign="top">
			<label for="field1"><?php _e('Location Loans'); ?></label>
		</th>
		<td>
			<input type="text" name="term_meta[field1]" value="<?php echo $term_meta['field1']?>"/>
			<span class="description"><?php _e('The Location loans'); ?></span>
		</td>
	</tr>
	<?php
}
?>
Các fields của taxonomy được lưu tại option get_option( "taxonomy_term_$t_id" );
Bước tiếp chúng ta cần lưu các trường của taxonomy, sử dụng hook ‘edited_
// lưu các trường custom của taxonomy kiểu bank
add_action( 'edited_bank-type', 'save_taxonomy_custom_fields', 10, 2 );
// A callback function to save our extra taxonomy field(s)
function save_taxonomy_custom_fields( $term_id ) {
    if ( isset( $_POST['term_meta'] ) ) {
        $t_id = $term_id;
        $term_meta = get_option( "taxonomy_term_$t_id" );
        $cat_keys = array_keys( $_POST['term_meta'] );
            foreach ( $cat_keys as $key ){
            if ( isset( $_POST['term_meta'][$key] ) ){
                $term_meta[$key] = $_POST['term_meta'][$key];
            }
        }
        //save the option array
        update_option( "taxonomy_term_$t_id", $term_meta );
    }
}
Giờ bạn muốn show các fields vừa thêm cho taxonomy, trong mục quản lý taxonomy của custom post type.
//hiển thị columns taxonomy
add_filter("manage_edit-bank-type_columns", 'banktax_columns');

function banktax_columns($theme_columns) {
    $new_columns = array(
        'cb' => '<input type="checkbox" />',
        'name' => __('Name'),
        'header_icon' => 'Icon',
		  'description' => __('Description'),
        'slug' => __('Slug'),
        'posts' => __('Posts')
        );
    return $new_columns;
}
//nội dung cột taxonomy
add_filter("manage_bank-type_custom_column", 'manage_banktax_columns', 10, 3);

function manage_banktax_columns($out, $column_name, $theme_id) {
   // $theme = get_term($theme_id, 'bank-type');
	$custom= get_option('taxonomy_term_'.$theme_id);
	$img=$custom['image']? $custom['image'] : plugins_url('assets/images/no-image.png',dirname(__FILE__));	//bank icon
    switch ($column_name) {
        case 'header_icon':
            // get header image url
            $out .= "<img class='bank-icon' src=\"{$img}\" width=\"250\" height=\"83\"/>";
            break;

        default:
            break;
    }
    return $out;
}
Đoạn Code ở trên sử dụng 2 hook, trong đó ‘manage_edit-bank-type_columns’ xác định tên cột fields, ‘manage_bank-type_custom_column’ hiển thị nội dung của fields.
Tạo Meta box cho custom post type
Để thêm fields cho custom post type, fields này sẽ xuất hiện trong phần nhập bài viết phía dưới mce editor. Tạo meta box cho custom post sử dụng hàm add_meta_box.
<?php
add_action('admin_init','custom_type1_meta_box');
function custom_type1_meta_box(){
    //'type1' là tên custom post
    add_meta_box("type1-meta", "Type1 Options", "type1_manager_meta_options", "type1", "normal", "high");
}
function type1_manager_meta_options(){
    global $post;
  if ( defined('DOING_AUTOSAVE') && DOING_AUTOSAVE )
    return $post_id;
    $custom=get_post_custom($post->ID);
    ?>
	<input type="text" name="field1"/>
	...
	<?php
}
?>
Bước tiếp theo là cần Lưu fields lại.
//lưu fields
add_action('save_post', 'type1_manager_save_extras');
function type1_manager_save_extras(){
  global $post;
 if ( defined('DOING_AUTOSAVE') && DOING_AUTOSAVE ){
    //if you remove this the sky will fall on your head.
    return $post_id;
  }elseif($post){
     update_post_meta($post->ID, "field1", $_POST["field1"]);
     update_post_meta($post->ID, "field1", $_POST["field2"]);
	 //..
  }
}
Hiển thị nội dung dữ liệu của trường (field) trong phần quản trị dữ liệu wordpress admin
Cũng giống như hiển thị meta field trong quản lý taxonomys, thay vì chỉ định taxonomy thì chỉ định custom post type.
//tạo cột trong danh sách bài viết cho kiểu này
add_filter("manage_edit-type1_columns", "type1_manager_edit_columns");
function type1_manager_edit_columns($columns){
  $columns = array(
    "cb" => "<input type=\"checkbox\" />",
    "title" => "Name",
    "description" => "Description",
	//custom field here
    "cat" => "Category",
	 "tag"=>"Tags"
  );
  return $columns;
}
add_action("manage_type1_posts_custom_column", "type1_manager_custom_columns");
function type1_manager_custom_columns($column){
  global $post;
  $custom = get_post_custom();
  switch ($column)
  {
	case 'description':
		the_content();
		break;
	case "cat":
		echo get_the_term_list($post->ID,'bds-type','',',');
	break;
	case "tag":
		the_tags();
	break;

    //custom field
  }
}
Ngoài bản chất dùng code trên, wordpress có plugin giúp bạn tạo field cho custom type rất mạnh ra, mình để nghị bạn nên sử dụng xem bài viết này.
Sử lý lỗi custom post type rewrite
Nếu Link Bài viết custom post type trả về 404, thì thêm dòng sau vào ngay sau hàm register_post_type.
flush_rewrite_rules(); //add this after register_post_type
Nguyên nhân custom post type rewrite chưa được tạo, bạn có thể tạo lại rewrite cho custom post type nếu như có mọi thay đổi.
add_action('init', 'my_rewrite');
function my_rewrite() {
    global $wp_rewrite;
    $wp_rewrite->flush_rules(); // !!!
}
Những gì vừa trình bầy trên đây là căn bản về sử dụng custom post type trong wordpress, Custom post type vô cùng quan trọng không có nó wordpress sẽ không phát triển được các plugin tuyệt vời như ngày nay. Có một vài plugin hỗ trợ bạn tạo custom post type, do vậy nếu không rành về code bạn đừng quá lo lắng, một số wordpress plugin tốt nhất tạo custom post type sau đây mà mình biết:
Custom Post Type UI
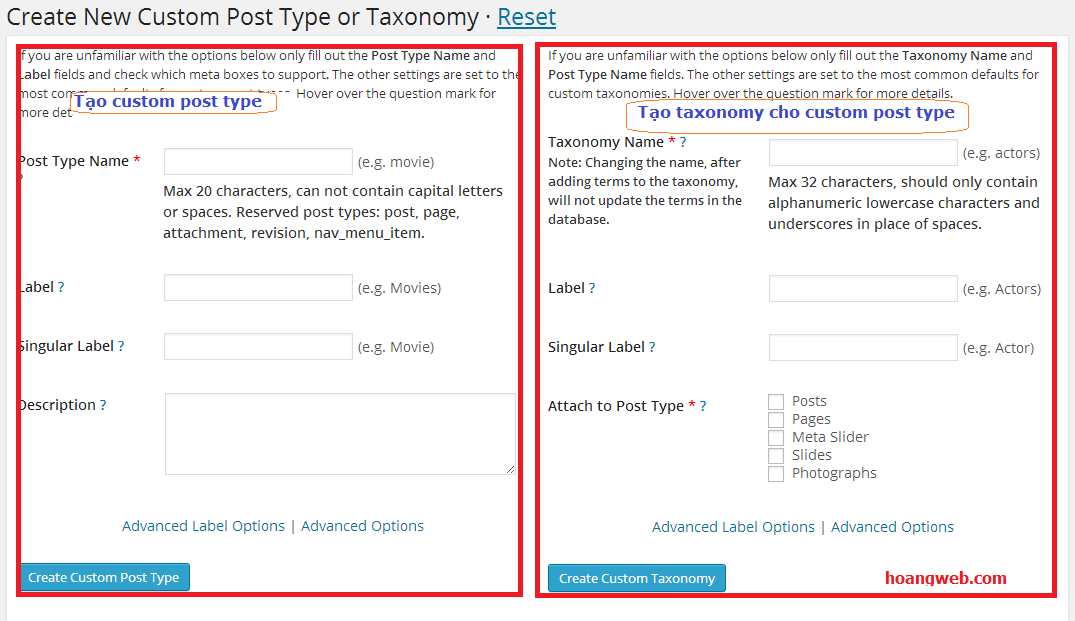
Trước tiên tải plugin Custom Post Type UI, sau đó kích hoạt plugin. Để thêm custom post type, bạn truy cập vào menu CPT UI->Add new.
Phần Bên trái tạo mới custom post type. Với plugin này việc tạo custom post type vô cùng đơn giản, khai báo một số thông tin cho custom post type của bạn:
- Post Type Name: tên sử dụng cho custom post type. Tối đã 20 ký tự, không được viết hoa và dấu cách. Trong WordPress ta biết có post type
post,page,attachment,nav_menu_item.. - Label: nhãn hiển thị của custom post type.
- Singular Label: nhãn hiển thị khi custom post type có một đối tượng (vd: khi custom post type có một bài viết).
- Description: Chuỗi ngắn mô tả custom post type.
- Show UI: tạo phần quản trị trong admin cho custom post type.
- Has Archive: post type có template archive. Chú ý: lựa chọn này là
truethì bật Rewrite = true - Custom Rewrite Slug: địa chỉ slug cho custom post type, nếu không chỉ định mặc định lấy Post Type Name.
- With Front: sử dụng front base? ví dụ nếu web có địa chỉ (base):
/blog/chọn false địa chỉ post type (news) sẽ là/news/, chọn true ->:/blog/news/ - Support: hỗ trợ một số fields mặc định.
- Built-in Taxonomies: chọn taxonomies cho custom post type này có trong danh sách. Nếu chưa tạo taxonomy thì để lại mục này, sau khi đã có taxonomy thì sửa lại mục này.
Khi nhập đầy đủ thông tin nhấn vào Create Custom Post Type để hoàn tất việc tạo kiểu dữ liệu. Xem hình dưới:
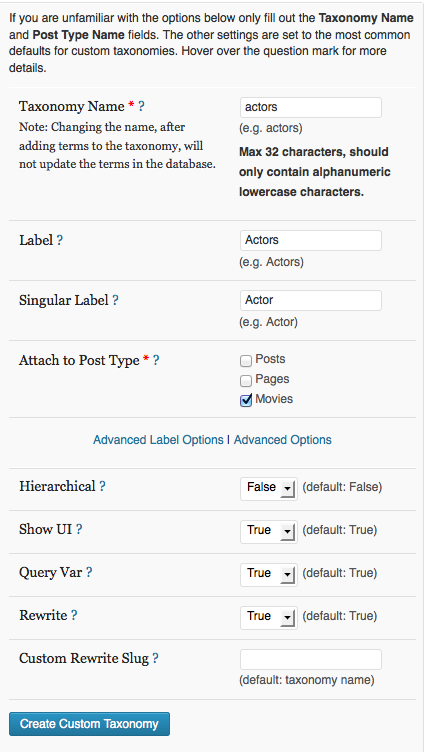
Phần bên đăng ký taxonomy. Tương tự như đăng ký post type, nhập các thông tin cho taxonomy, chú ý: dòng Attach to Post Type chọn vào tên custom post type vừa tạo ở trên để liên kết chúng với nhau.
Custom post type sau khi được tạo xuất hiện một menu mới trong phần quản trị. Ví dụ:

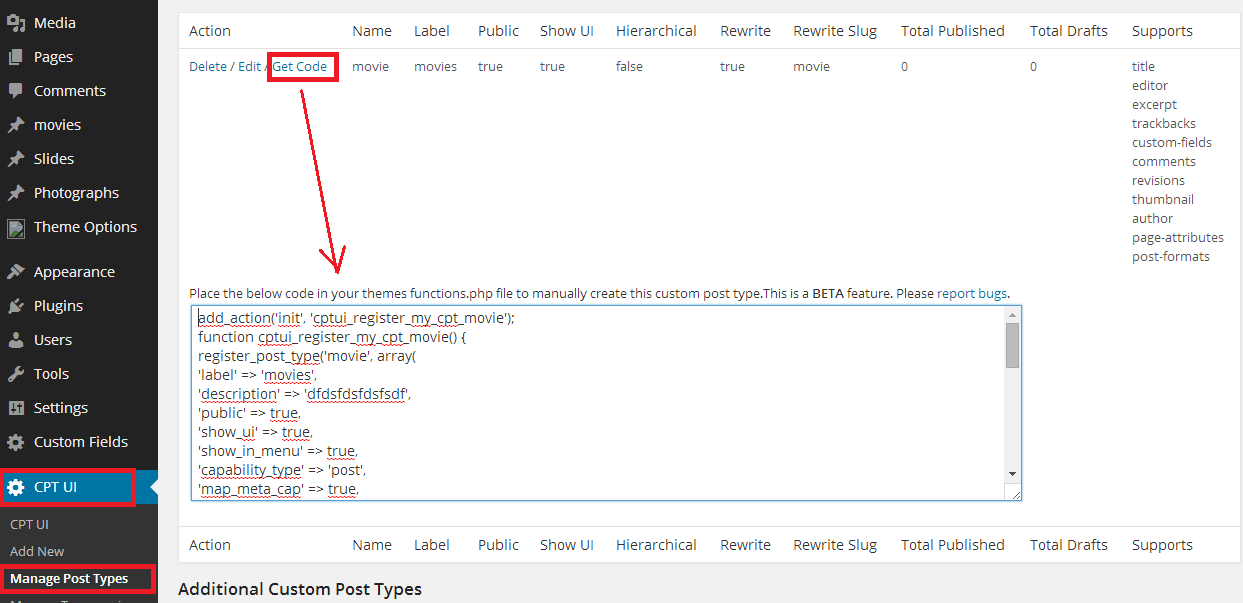
wordpress custom post type cho phép tạo nhiều post type và taxonomies. Để biết các custom post type có trong wordpress được tạo bởi plugin này hoặc do plugin khác sinh ra: CPT UI->Manage Post Types. Quản lý taxonomies: CPT UI->Manage Taxonomies
Nhấn vào get code để lấy mã sinh ra của custom post type/taxonomy.

Plugin chỉ hỗ trợ tạo custom type trên giao diện không có tác dụng thay thế wordpress api. Plugin sinh ra mã code mà mình đã đề cập ở phần đầu bài viết.
Chúc bạn thành công.
Nếu bạn thấy bài viết này hữu ích, hãy chia sẻ với bạn bè bằng cách nhấn nút chia sẻ ở bên dưới. Theo dõi chúng tôi trên Twitter và Facebook
- shares
- Facebook Messenger
- Gmail
- Viber
- Skype


