- shares
- Facebook Messenger
- Gmail
- Viber
- Skype
Nhiều cửa hàng muốn tùy biến thêm trường ở trang thanh toán, khi đặt hàng. Điều này sẽ mở rộng tính năng sử lý đơn hàng của từng cửa hàng, mõi cửa hàng có những yêu cầu tùy chỉnh riêng, để làm điều này bạn sử dụng API trong WooCommerce.
Trên WordPress Plugins có một số tác giả đã xây dựng plugins miễn phí giúp bạn thêm trường bổ xung cho trang thanh toán một cách dễ dàng, tuy nhiên bài hôm nay mình sẽ sử dụng Hook để giúp các bạn hiểu bản chất của công việc.
Nếu bạn không phải là người làm code và dễ tạo ra lỗi WooCommerce có xuất bản plugin WooCommerce Checkout Field Editor, bạn có thể cài đặt và sử dụng nó rất đơn giản. Với plugin này chúng ta không cần thêm trường vào trong tệp functions.php
Trường thông tin hóa đơn và vận chuyển cho thanh toán được xây dựng từ class class-wc-countries.php & hàm get_address_fields. Điều này cho phép WooCommerce kích hoạt trường hoặc vô hiệu hóa dựa trên thông tin người dùng.
WooCommerce sử dụng filter cho mỗi trường tạo ra để bạn có thể tùy chỉnh các fields, nó sẽ cho phép các plugins ngoài can thiệp vào từng trường. Bạn đặt code trong theme hoặc plugins để sửa trường mong muốn.
//billing
$address_fields = apply_filters('woocommerce_billing_fields', $address_fields);

//Shipping
$address_fields = apply_filters('woocommerce_shipping_fields', $address_fields);
Class checkout nạp tất cả các fields với mảng ‘checkout_fields’ cũng như thêm một vài trường khác như ‘order notes’.
$this->checkout_fields['billing']    = $woocommerce->countries->get_address_fields( $this->get_value('billing_country'), 'billing_' );
$this->checkout_fields['shipping']   = $woocommerce->countries->get_address_fields( $this->get_value('shipping_country'), 'shipping_' );
$this->checkout_fields['account']    = array(
    'account_username' => array(
        'type' => 'text',
        'label' => __('Account username', 'woocommerce'),
        'placeholder' => _x('Username', 'placeholder', 'woocommerce')
        ),
    'account_password' => array(
        'type' => 'password',
        'label' => __('Account password', 'woocommerce'),
        'placeholder' => _x('Password', 'placeholder', 'woocommerce'),
        'class' => array('form-row-first')
        ),
    'account_password-2' => array(
        'type' => 'password',
        'label' => __('Account password', 'woocommerce'),
        'placeholder' => _x('Password', 'placeholder', 'woocommerce'),
        'class' => array('form-row-last'),
        'label_class' => array('hidden')
        )
    );
$this->checkout_fields['order']  = array(
    'order_comments' => array(
        'type' => 'textarea',
        'class' => array('notes'),
        'label' => __('Order Notes', 'woocommerce'),
        'placeholder' => _x('Notes about your order, e.g. special notes for delivery.', 'placeholder', 'woocommerce')
        )
    );
Và mảng này được lọc thông qua filter:
$this->checkout_fields = apply_filters('woocommerce_checkout_fields', $this->checkout_fields);
Với sự linh hoạt này bạn sẽ có mọi cách để thay đổi trường thanh toán tùy ý.
Ghi đè trường mặc định
Sử dụng hook trên, cho bạn sửa mọi trường trên trang thanh toán, ví dụ sau mình đổi thuộc tính placeholder cho trường ‘order_comments’ với tên hiển thị mới. Thêm đoạn code sau trong functions.php
// Hook in
add_filter( 'woocommerce_checkout_fields' , 'custom_override_checkout_fields' );

// Our hooked in function - $fields is passed via the filter!
function custom_override_checkout_fields( $fields ) {
     $fields['order']['order_comments']['placeholder'] = 'My new placeholder';
     return $fields;
}
Một ví dụ khác để thay đổi nhãn label.
// Hook in
add_filter( 'woocommerce_checkout_fields' , 'custom_override_checkout_fields' );

// Our hooked in function - $fields is passed via the filter!
function custom_override_checkout_fields( $fields ) {
     $fields['order']['order_comments']['placeholder'] = 'My new placeholder';
     $fields['order']['order_comments']['label'] = 'My new label';
     return $fields;
}
Hoặc bạn muốn xóa các trường không sử dụng:
// Hook in
add_filter( 'woocommerce_checkout_fields' , 'custom_override_checkout_fields' );

// Our hooked in function - $fields is passed via the filter!
function custom_override_checkout_fields( $fields ) {
     unset($fields['order']['order_comments']);

     return $fields;
}
Bạn tham khảo danh sách trường có sử dụng mà có thể sửa bởi filter ‘woocommerce_checkout_fields’:
- Billing
billing_first_namebilling_last_namebilling_companybilling_address_1billing_address_2billing_citybilling_postcodebilling_countrybilling_statebilling_emailbilling_phone
- Shipping
shipping_first_nameshipping_last_nameshipping_companyshipping_address_1shipping_address_2shipping_cityshipping_postcodeshipping_countryshipping_state
- Account
account_usernameaccount_passwordaccount_password-2
- Order
order_comments
Mỗi trường có định nghĩa kiểu và thông tin, gồm:
type– kiểu trường (text, textarea, password, select)label– nhãn hiển thị cho input fieldplaceholder– thuộc tính placeholderclass– tên classrequired– true / false, có yêu cầu bắt buộc ?clear– true / false, thêm ‘clear fix’ style cho field/labellabel_class– tên class cho nhãnoptions– áp dụng với trường select , mảng giá trị options (key => value)
Một trường hợp đặc biệt, bạn cần sử dụng filter ‘woocommerce_default_address_fields’. API này được sử dụng lọc cho tất cả các trường hóa đơn (billing) và vận chuyển (shipping):
country
first_namelast_namecompanyaddress_1address_2citystatepostcode
Ví dụ đơn giản sau để tùy biến trường ‘address_1’.
// Hook in
add_filter( 'woocommerce_default_address_fields' , 'custom_override_default_address_fields' );

// Our hooked in function - $address_fields is passed via the filter!
function custom_override_default_address_fields( $address_fields ) {
     $address_fields['address_1']['required'] = false;

     return $address_fields;
}
Trường chọn ‘Select’
Nếu bạn thêm kiểu trường select, như ở phần trên bạn sẽ thấy có thêm định nghĩa options dạng mảng key-value cho trường. VD:
$fields['billing']['your_field']['options'] = array(
  'option_1' => 'Option 1 text',
  'option_2' => 'Option 2 text'
);
Đó là một trong những ứng dụng Hook để tùy biến WooCommerce, ví dụ tiếp theo này liên quan tới nút “Return to Shop” bạn có thể tìm thấy ở giỏ hàng. Bạn muốn chuyển sang liên kết khác khi nhấn vào nút này, hãy sử dụng code dưới đây:
/**
 * Changes the redirect URL for the Return To Shop button in the cart.
 */
function wc_empty_cart_redirect_url() {
  return 'http://example.url/category/specials/';
}
add_filter( 'woocommerce_return_to_shop_redirect', 'wc_empty_cart_redirect_url', 10 );
Đoạn code trên có hoạt động không? không vì chúng ta nếu để ý sẽ thấy thứ tự ưu tiên của hàm filter trên là 10, giá trị này trùng mặc định bởi WooCommerce, do đó ví dụ trên không có tác dụng & nút “Return to Shop” không có gì thay đổi.
Chúng ta cần thay đổi một giá trị lớn hơn 10, VD 11, cách tốt nhất bạn nên tăng giá trị priority theo hệ 10, chẳng hạn 20,30 . Sửa lại code trên:
/**
 * Changes the redirect URL for the Return To Shop button in the cart.
 */
function wc_empty_cart_redirect_url() {
  return 'http://example.com/category/specials/';
}
add_filter( 'woocommerce_return_to_shop_redirect', 'wc_empty_cart_redirect_url', 20 );
Sử dụng chỉ số thứ tự (priority), chúng ta có thể thêm nhiều hàm cho cùng một hook, thứ tự hàm sử lý dựa trên chỉ số ưu tiên và giá trị cuối cùng nhận được bởi hàm sử lý cuối cùng trong số hàm bạn gán cho hook. Ví dụ sau có thay đổi liên kết nút tới trang ‘http://example.com/category/specials/’
/**
 * Changes the redirect URL for the Return To Shop button in the cart.
 * BECAUSE THIS FUNCTION HAS THE PRIORITY OF 20, IT WILL RUN AFTER THE FUNCTION BELOW (HIGHER NUMBERS RUN LATER)
 */
function wc_empty_cart_redirect_url() {
  return 'http://example.com/category/specials/';
}
add_filter( 'woocommerce_return_to_shop_redirect', 'wc_empty_cart_redirect_url', 20 );

/**
 * Changes the redirect URL for the Return To Shop button in the cart.
 * EVEN THOUGH THIS FUNCTION WOULD NORMALLY RUN LATER BECAUSE IT'S CODED AFTERWARDS, THE 10 PRIORITY IS LOWER THAN 20 ABOVE
 */
function wc_empty_cart_redirect_url() {
  return 'http://example.com/shop/';
}
add_filter( 'woocommerce_return_to_shop_redirect', 'wc_empty_cart_redirect_url', 10 );
Thêm trường tùy chỉnh shipping & billing
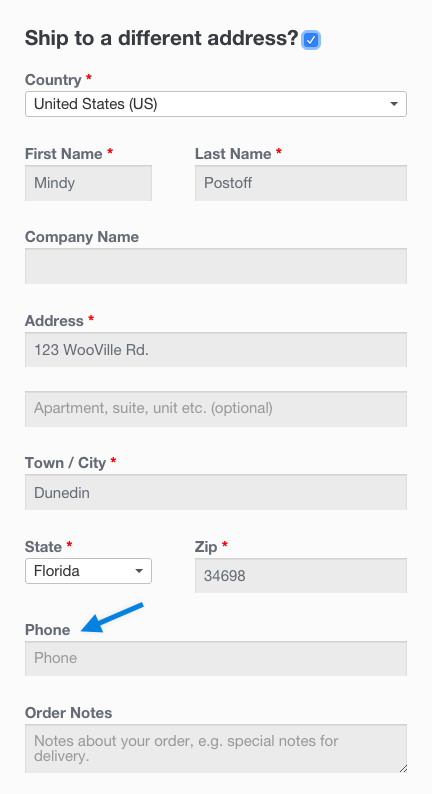
Theo như cách ghi đè trường bạn dễ dàng sửa trường hoặc định nghĩa trường mới. Ví dụ sau mình thêm trường ‘shipping_phone’ cho các trường vận chuyển.
// Hook in
add_filter( 'woocommerce_checkout_fields' , 'custom_override_checkout_fields' );

// Our hooked in function - $fields is passed via the filter!
function custom_override_checkout_fields( $fields ) {
     $fields['shipping']['shipping_phone'] = array(
        'label'     => __('Phone', 'woocommerce'),
    'placeholder'   => _x('Phone', 'placeholder', 'woocommerce'),
    'required'  => false,
    'class'     => array('form-row-wide'),
    'clear'     => true
     );

     return $fields;
}

/**
 * Display field value on the order edit page
 */

add_action( 'woocommerce_admin_order_data_after_shipping_address', 'my_custom_checkout_field_display_admin_order_meta', 10, 1 );

function my_custom_checkout_field_display_admin_order_meta($order){
    echo '<p><strong>'.__('Phone From Checkout Form').':</strong> ' . get_post_meta( $order->get_id(), '_shipping_phone', true ) . '</p>';
}

Lưu ý, trường mới này sẽ được tự động lưu vào giá trị meta, bởi vì chúng ta định nghĩa nó trong mảng checkout_fields, (nó có dạng _shipping_phone).
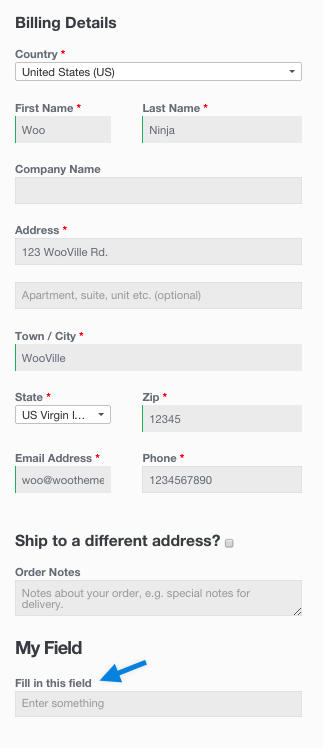
Ví dụ sau, là một cách khác để bạn thêm trường mới bằng cách sử dụng hàm woocommerce_form_field cũng tương như filter fields, nhưng có thể sử dụng ở mọi nơi.
/**
 * Add the field to the checkout
 */
add_action( 'woocommerce_after_order_notes', 'my_custom_checkout_field' );

function my_custom_checkout_field( $checkout ) {

    echo '<div id="my_custom_checkout_field"><h2>' . __('My Field') . '</h2>';

    woocommerce_form_field( 'my_field_name', array(
        'type'          => 'text',
        'class'         => array('my-field-class form-row-wide'),
        'label'         => __('Fill in this field'),
        'placeholder'   => __('Enter something'),
        ), $checkout->get_value( 'my_field_name' ));

    echo '</div>';

}

Về cơ bản, mọi trường tạo ra trong WooCommerce sử dụng hàm woocommerce_form_field, và thông qua một filter cùng tên để cho phép bên thứ 3 mở rộng tùy chỉnh. Bạn muốn tạo trường với kiểu riêng, bạn tự định nghĩa? sử dụng filter này bạn sẽ bổ xung thêm các trường của mình trước khi hiển thị cho người dùng đầu cuối.
Ví dụ sau, mình khai báo kiểu trường ‘radio1’ & thêm thuộc tính ‘help’ mô tả cho mỗi giá trị chọn radio.
add_filter('woocommerce_form_field', '_woocommerce_form_field', 500, 4);
function _woocommerce_form_field($field, $key, $args, $value) {
	$field_container = '<p class="form-row %1$s" id="%2$s" data-priority="' . esc_attr( $sort ) . '">%3$s</p>';

	if($args['type']=='radio1') {
		$field='';
		$label_id = current( array_keys( $args['options'] ) );
		if(!isset($args['input_class'])) $args['input_class']=[];

				if ( ! empty( $args['options'] ) ) {
					foreach ( $args['options'] as $option_key => $item ) {
						$option_text = is_string($item)? $item: $item['text'];
						$help = is_array($item)? $item['help']: '';

						$field.= sprintf('<div class="wraper-field wraper-field-%s">', $key);
						$field .= '<input type="radio" class="input-radio ' . esc_attr( implode( ' ', $args['input_class'] ) ) . '" value="' . esc_attr( $option_key ) . '" name="' . esc_attr( $key ) . '" ' . implode( ' ', $args['custom_attributes'] ) . ' id="' . esc_attr( $args['id'] ) . '_' . esc_attr( $option_key ) . '"' . checked( $value, $option_key, false ) . ' />';
						$field .= '<label for="' . esc_attr( $args['id'] ) . '_' . esc_attr( $option_key ) . '" class="radio ' . implode( ' ', $args['label_class'] ) . '">' . $option_text . '</label>';
						if($help) $field.= '<div class="help-block">'.$help.'</div>';
						$field.='</div>';
					}
				}
	}
	if(in_array($args['type'], ['radio1'])) {
		if ( ! empty( $field ) ) {
			$field_html = '';

			if ( $args['label'] && 'checkbox' !== $args['type'] ) {
				$field_html .= '<label for="' . esc_attr( $label_id ) . '" class="' . esc_attr( implode( ' ', $args['label_class'] ) ) . '">' . $args['label'] . $required . '</label>';
			}

			$field_html .= '<span class="woocommerce-input-wrapper">' . $field;

			if ( $args['description'] ) {
				$field_html .= '<span class="description" id="' . esc_attr( $args['id'] ) . '-description" aria-hidden="true">' . wp_kses_post( $args['description'] ) . '</span>';
			}

			$field_html .= '</span>';

			$container_class = esc_attr( implode( ' ', $args['class'] ) );
			$container_id    = esc_attr( $args['id'] ) . '_field';
			$field           = sprintf( $field_container, $container_class, $container_id, $field_html );
		}
	}
	return $field;
}
Để minh hoạt ví dụ trên, mình sẽ thêm trường billing với kiểu radio1 ,bởi filter ‘woocommerce_billing_fields’. Xem đoạn code dưới đây:
add_filter( 'woocommerce_billing_fields', 'woo_filter_state_billing', 10, 1 );
function woo_filter_state_billing( $fields=[] ) {
	$fields['shipping_method'] = [
		'label'=> 'PHƯƠNG THỨC GIAO HÀNG',
		'type'=> 'radio1',
		'options'=> [
			'ship-method-1'=> ['text'=>'Giao hàng tận nơi','help'=>'Theo chính sách giao hàng của công ty. Cước phí vận chuyển sẽ được thông báo trực tiếp đến khách hàng'],
			'ship-method-2'=> ['text'=>'Gửi đảm bảo qua dịch vụ vận tải','help'=>'Khách hàng phải thanh toán tiền trước khi giao hàng (chuyển khoản, nhờ người thân thanh toán hoặc thanh toán tại nhà xe dịch vụ vận tải ). Chúng tôi sẽ được hỗ trợ vận chuyển thông qua các nhà xe tạo sự thuận tiện nhất mà hàng có thể đến với khách hàng. Thời gian nhận hàng trung bình từ 3h-24h tùy theo nhà xe.']
		],
		'required' => 1,
	];
}
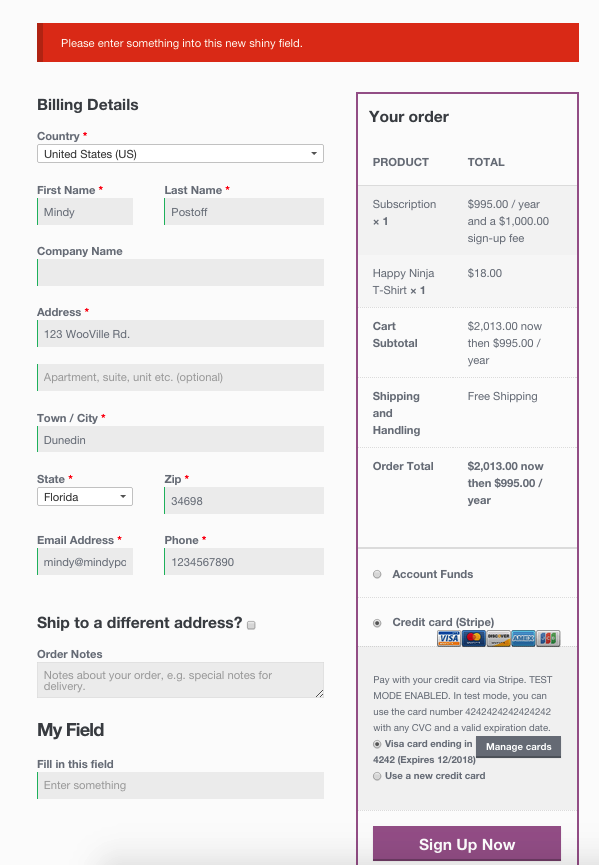
WooCommerce cho phép xác minh giá trị trường trước khi khách hàng kết thúc đơn hàng, ví dụ bạn sẽ cần kiểm tra tính hợp lệ của trường nhập bởi người dùng. Field bắt buộc điền?
/**
 * Process the checkout
 */
add_action('woocommerce_checkout_process', 'my_custom_checkout_field_process');

function my_custom_checkout_field_process() {
    // Check if set, if its not set add an error.
    if ( ! $_POST['my_field_name'] )
        wc_add_notice( __( 'Please enter something into this new shiny field.' ), 'error' );
}
Trang thanh toán hiển thị lỗi do người dùng chưa điền trường được yêu cầu?

Cuối cùng, bạn đừng quên lưu trường mới của đơn hàng vào thông tin tùy chỉnh, sử dụng code sau đây:
/**
 * Update the order meta with field value
 */
add_action( 'woocommerce_checkout_update_order_meta', 'my_custom_checkout_field_update_order_meta' );

function my_custom_checkout_field_update_order_meta( $order_id ) {
    if ( ! empty( $_POST['my_field_name'] ) ) {
        update_post_meta( $order_id, 'My Field', sanitize_text_field( $_POST['my_field_name'] ) );
    }
}
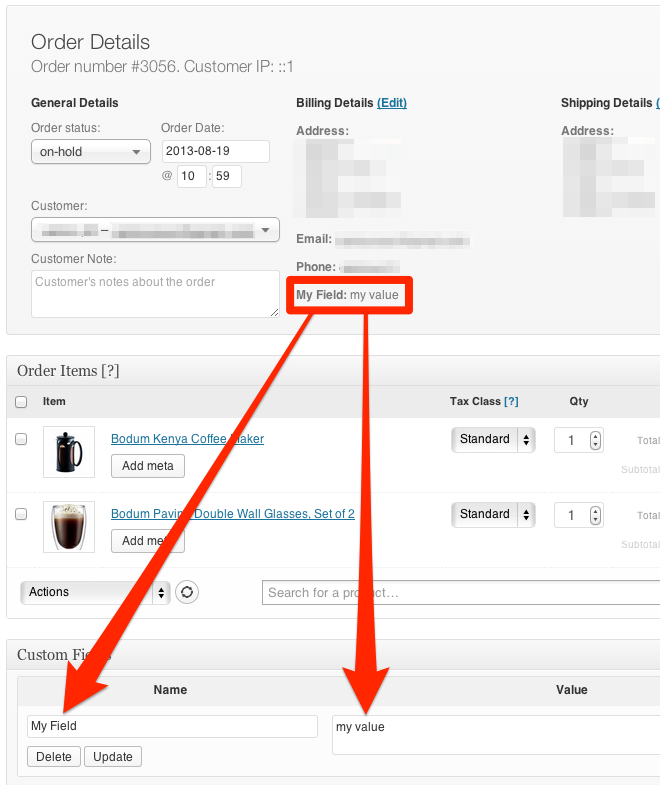
Trường của bạn bây giờ đã được lưu. Nếu bạn muốn hiển thị những trường này trên trang quản lý đơn hàng trong Admin, bạn có thể sử dụng Api sau:
/**
 * Display field value on the order edit page
 */
add_action( 'woocommerce_admin_order_data_after_billing_address', 'my_custom_checkout_field_display_admin_order_meta', 10, 1 );

function my_custom_checkout_field_display_admin_order_meta($order){
    echo '<p><strong>'.__('My Field').':</strong> ' . get_post_meta( $order->id, 'My Field', true ) . '</p>';
}
kết quả:

Mình hy vọng bài viết này giúp bạn được phần nào, giúp bạn tùy biến trường thanh toán một cách dễ dàng bằng nhiều cách khác nhau. Chúc bạn thành công.
Nếu bạn thích bài viết này, hãy ủng hộ chúng tôi bằng cách đăng ký nhận bài viết mới ở bên dưới và đừng quên chia sẻ kiến thức này với bạn bè của bạn nhé. Bạn cũng có thể theo dõi blog này trên Twitter và Facebook
- shares
- Facebook Messenger
- Gmail
- Viber
- Skype