Nội dung
- shares
- Facebook Messenger
- Gmail
- Viber
- Skype
Đôi khi nó là cần thiết để tạo ra một giao diện đồ họa trực quan cho các khách hàng, mà cho phép tải lên hình ảnh hoặc các tập tin khác cho bài viết hay trong cài đặt trang web một cách dễ dàng.
Đối với tôi nó sẽ ok nếu các thiết lập trang web có một trường nhập văn bản, nơi tôi có thể đặt URL hình ảnh. Nhưng nó không phải là đủ cho người dùng thông thường. Nó thậm chí còn không chuyên nghiệp.
Trong bài này, mình sẽ chỉ cho bạn cách để tạo một trình tải file đơn giản và có thể tùy biến cho trang web của bạn.
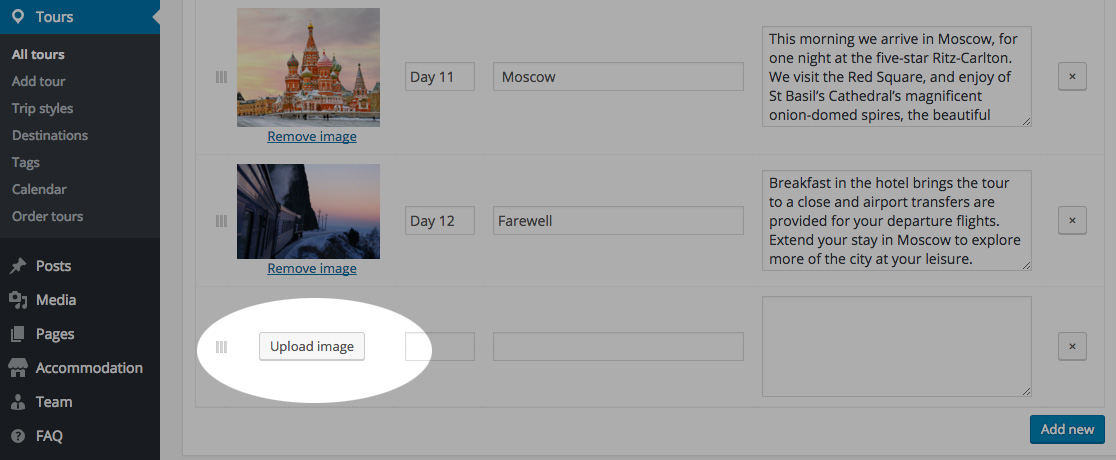
Ví dụ nút upload được thêm để tải tệp ở ngay vị trí tệp sẽ xuất hiện, trông khá trực quan.

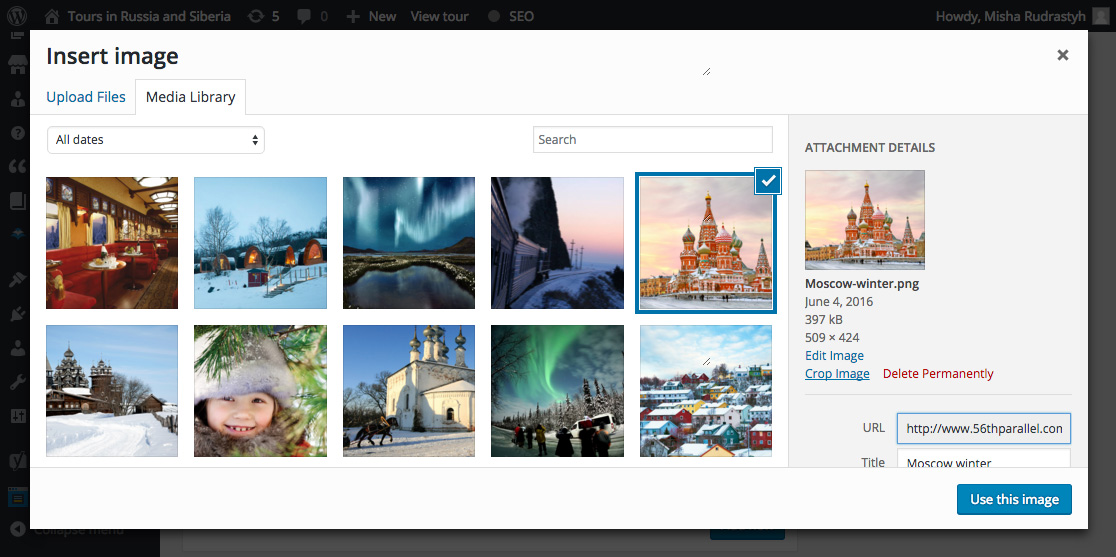
Nếu bạn bấm vào nút Upload image, trình tải tệp của WordPress sẽ được mở ra. Trong cửa sổ này bạn có thể chọn một trong những hình ảnh được tải lên trước hoặc tải lên một hình ảnh mới.

Một số tuỳ chỉnh khác:
- bạn có thể thay đổi tiêu đề của thư viện Media popup (Insert image) và nhãn của nút (Use this image),
- bạn cũng có thể cấu hình trong mã code một cách dễ dàng nếu bạn muốn đính kèm hình ảnh đã tải lên vào bài hiện tại hay không,
- lựa chọn nhiều hình ảnh cùng lúc được cho phép.
Nếu hình ảnh được chọn, bạn có thể click vào nó để chọn một ảnh khác thay thế hoặc loại bỏ nó bằng cách nhấn liên kết Remove image.

Hãy đọc tiếp hướng dẫn ở bên dưới nhé.
3 bước đơn giản để Tạo Nút tải hình ảnh trên Website riêng của bạn
Bước 1. Sử dụng jQuery
Nếu bạn không biết nhiều về jQuery, tạo một file .js trong thư mục theme WordPress hiện tại của bạn.
Bước 2. sử dụng wp_enqueue_script () và wp_enqueue_media ()
Chúng ta cần đoạn mã này để thêm mã javascript trong khu vực quản trị WordPress. Dán đoạn mã sau vào file functions.php trong thư mục giao diện của bạn.
function misha_include_myuploadscript() {
	/*
	 * I recommend to add additional conditions just to not to load the scipts on each page
	 * like:
	 * if ( !in_array('post-new.php','post.php') ) return;
	 */
	if ( ! did_action( 'wp_enqueue_media' ) ) {
		wp_enqueue_media();
	}

 	wp_enqueue_script( 'myuploadscript', get_stylesheet_directory_uri() . '/customscript.js', array('jquery'), null, false );
}

add_action( 'admin_enqueue_scripts', 'misha_include_myuploadscript' );
Bước 3. Sử dụng hàm PHP
Tiếp theo bạn chèn mã này vào cuối file functions.php.
/*
* @param string $name Name of option or name of post custom field.
* @param string $value Optional Attachment ID
* @return string HTML of the Upload Button
*/
function misha_image_uploader_field( $name, $value = '') {
$image = ' button">Upload image';
$image_size = 'full'; // it would be better to use thumbnail size here (150x150 or so)
$display = 'none'; // display state ot the "Remove image" button
if( $image_attributes = wp_get_attachment_image_src( $value, $image_size ) ) {
// $image_attributes[0] - image URL
// $image_attributes[1] - image width
// $image_attributes[2] - image height
$image = '"><img class="" style="display: block; max-width: 95%;" data-src="'%20.%20%24image_attributes%5B0%5D%20.%20'" />';
$display = 'inline-block';
}
return '<div><a id="' . $name . '" class="misha_upload_image_button' . $image . '</a>
<input type=" hidden="" href="#" name="' . $name . '"></a> <a class="misha_remove_image_button" style="display: ' . $display . ';" href="#">Remove image</a></div>';
}
Ví dụ 1. Media Uploader với Meta Boxes
Để thêm trình tải media vào metabox bạn sử dụng mã sau đây:
/*
 * Add a meta box
 */
add_action( 'admin_menu', 'misha_meta_box_add' );

function misha_meta_box_add() {
	add_meta_box('mishadiv', // meta box ID
		'More settings', // meta box title
		'misha_print_box', // callback function that prints the meta box HTML
		'post', // post type where to add it
		'normal', // priority
		'high' ); // position
}

/*
 * Meta Box HTML
 */
function misha_print_box( $post ) {
	$meta_key = 'second_featured_img';
	echo misha_image_uploader_field( $meta_key, get_post_meta($post->ID, $meta_key, true) );
}

/*
 * Save Meta Box data
 */
add_action('save_post', 'misha_save');

function misha_save( $post_id ) {
	if ( defined('DOING_AUTOSAVE') && DOING_AUTOSAVE )
		return $post_id;

	$meta_key = 'second_featured_img';

	update_post_meta( $post_id, $meta_key, sanitize_text_field( $_POST[$meta_key] ) );

	// if you would like to attach the uploaded image to this post, uncomment the line:
	// wp_update_post( array( 'ID' => $_POST[$meta_key], 'post_parent' => $post_id ) );

	return $post_id;
}
Ví dụ 2. Media Uploader trong trang cài đặt Option
Tương tự, bạn chèn đoạn mã dưới đây vào file functions.php :
add_action('admin_menu', 'misha_add_options_page');

function misha_add_options_page() {
	$page_slug = 'uplsettings';
	$option_name = 'header_img';

	if ( isset( $_GET['page'] ) && $_GET['page'] == $page_slug ) {
		if ( isset( $_REQUEST['action'] ) && 'save' == $_REQUEST['action'] ) {
			update_option( $option_name, sanitize_text_field( $_REQUEST[ $option_name ] ) );
			header('Location: '. site_url() .'/wp-admin/options-general.php
page=' . $page_slug . '&saved=true');
			die;
		}
	}
	add_submenu_page('options-general.php','More settings','More settings (title)', 'edit_posts', $page_slug, 'misha_print_options_page');
}

function misha_print_options_page() {

	$option_name = 'header_img';

	if ( isset( $_REQUEST['saved'] ) ){
		echo '<div class="updated">Saved.</div>';
}
echo '<div class="wrap"></div>';
}
Ví dụ 3. Đơn giản hơn bằng cách viết plugin cho WordPress
Trước hết bạn cần cài plugin meta boxes options pages trên trang web WordPress của bạn.
Meta Box
Mã sau sẽ thêm một nút tải lên một cách dễ dàng (thêm vào functions.php ):
new trueMetaBox( array(
		'id'	=>	'misha', // metabox ID, this is also used as custom field prefix
		'name'	=>	'Metabox with the image upload button', // title
		'post_type'	=> array('page'), // post types here
		'priority'	=> 'high', // low
 high
 default
		'capability'=>	'edit_posts', // capabilities the user should have to edit this metabox
		'args'	=>	array(

			array(
				'id'		=> 'img',
				'label'		=> 'Image',
				'description'	=> 'The upload button description should be here.',
				'type'		=> 'image'
			)

		)
	)
);
Kết quả:

Option page
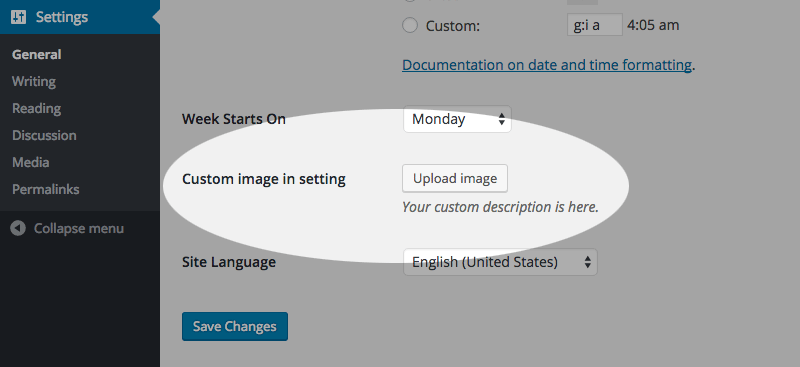
Và bạn chỉ cần sử dụng đoạn mã sau đây để thêm một nút Upload trong trang Settings > General.
new trueOptionspage( array(
	'slug'		=> 'general',
	'sections' 	=> array(
 		array(
			'id'	=> 'default',
			'fields'=> array(
				array(
					'id'		=> 'img1',
					'label'		=> 'Custom image in setting',
					'description'	=> 'Your custom description is here.',
					'type'		=> 'image'
				)
 			)
		)
	)
));

Thật đơn giản phải không, tuy nhiên bạn sẽ phải trả phí để mua framework này. Nếu bạn có bất cứ câu hỏi thắc mắc cần mình giải đáp vui lòng để lại ý kiến dưới bài viết này nhé.
Nếu bạn thích bài viết này, hãy ủng hộ chúng tôi bằng cách đăng ký nhận bài viết mới ở bên dưới và đừng quên chia sẻ kiến thức này với bạn bè của bạn nhé. Bạn cũng có thể theo dõi blog này trên Twitter và Facebook
- shares
- Facebook Messenger
- Gmail
- Viber
- Skype